Welcome Installers & DIY (Do it Yourself) 'ers
Welcome to the installation instructions for MonsterRax overhead
storage racks. Read, Learn, and Install!
If you already know how to install and you would like to buy
one or more MonsterRax, visit the
MonsterRax Order Page.
Required
Tools:
•Rubber Mallet
or Hammer
•Drill with 3/16”
bit
•Socket Set, Adjustable
Crescent Wrench or Open End Wrench Set
•Flat Head Screwdriver
•Tape Measure
•Stud Finder (if
installing on ceiling drywall)
•Sturdy Ladder
|
|
Step 1
4 x 8’ Unit:
4 x 6’ Unit:
4 x 4’ Unit:
2 x 8’ Unit:
|
3 x 8’ Unit:
3 x 6’ Unit:
2 x 6’ Unit:
|
If for any reason you are missing any of the above parts
from your MONSTERRAX unit, please call us at 1-877-655-3443.
Ensure all the required tools available for your installation
and a clear path to work during installation.
Step 2
Determine the desired location
for the unit and survey the ceiling
structure. Remember, you will roughly
need enough ceiling space for the size
of the rack you are installing. Start
by locating the ceiling joists (the
horizontal studs or beam components
of the ceiling structure). If your garage
has finished drywall on the ceiling,
use a stud finder to locate both sides
of the ceiling joists. Use a pencil
to mark both sides of the ceiling joist.
See FIG 1. WARNING: This system is
not intended for steel framed homes.
Do not attempt mounting to steel beams.
|
 |
| FIG 1 |
|
|
 |
| FIG 2 |
|
|
|
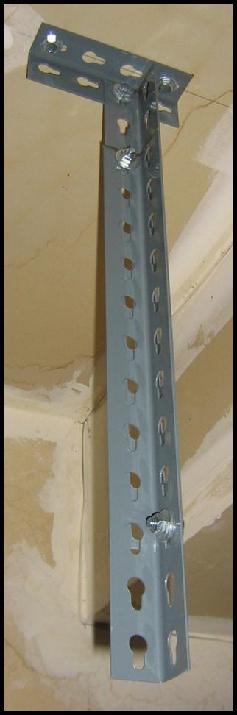
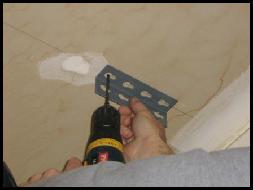
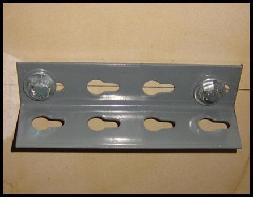
The idea for mounting the ceiling brackets
is to get the screws to go into the center
of the ceiling joist. Each angle of the
ceiling bracket is 1 ½” so center it up
within the two lines you have drawn. Hold
the bracket against the ceiling with your
hand and place a mark on the ceiling inside
the two end holes. See FIG 2. Use a 3/16”
drill bit and drill a tap hole at least
2 ½” deep before insert the lag screws.
See FIG 2 and 3.
|
 |
| FIG 3 |
|
|
 |
| FIG 4 |
|
|
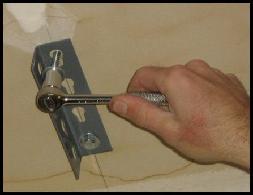
Place a washer on the lag screws
and drive them into the holes you drilled.
DO NOT OVER TIGHTEN.
It is possible to strip out the hole
or break the screw if you over tighten.
See FIG 3 and 4.
WARNING:
For SAFETY, each lag screw needs to
be driven at least 2” into the wood
joists above.
Six inch ceiling brackets work for the
majority of framed garages. In some
cases, you may need a longer one. Ceiling
brackets are available up to four-foot
lengths by calling 1-877-655-3443. We
will be happy to send you the pieces
you need to complete a proper and safe
installation.
|
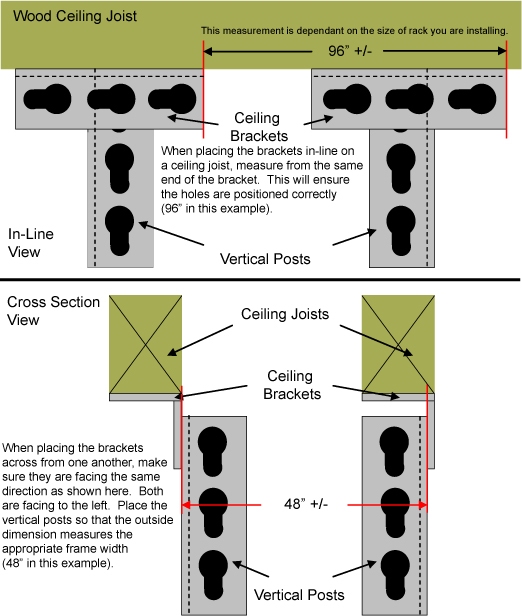
STEP 3
Use a tape measure to mark the remaining positions
for the other three ceiling brackets. The diagrams
below show how a 4 x 8’ unit fits on a ceiling
with joists at both 16” and 24” on-center. For
other frame sizes measure out the bracket placements
in the same way. IMPORTANT: All ceiling brackets
must face the same direction on the ceiling.
|
STEP 4
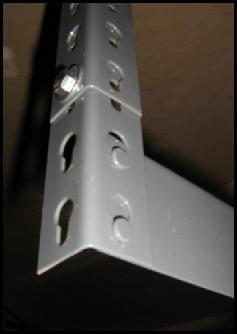
Take the vertical posts and adjust
them to the desired distance from the
ceiling. Ensure the lower section of
the vertical post is placed on the inside
of the two post pieces. Use two bolts
with washers on both sides to secure
the posts together. Next, use a single
bolt, with washers on both sides, and
connect the vertical post assembly to
the ceiling bracket. Repeat this step
for all four posts. IMPORTANT:
Ensure the teardrop holes are facing
down. See FIG 5, 6 and 7.
|
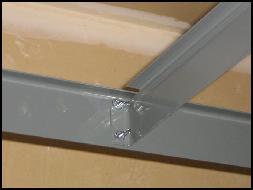
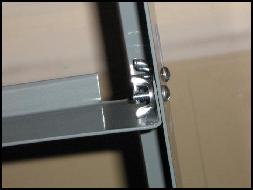
STEP 5
Once all vertical posts are in place, begin
placing the side beams. Start on the short
ends and finish with the long sides.
IMPORTANT: For Safety, use a helper when
securing the beams. Seat the rivets
into the holes using a rubber mallet or
hammer. Continue seating the remaining beams.
WARNING: Opposite
ends may come loose when hammering beams
in place. Use a helper to ensure rivets
do not come loose during the seating process.
Beams can come loose and fall potentially
causing damage or injury. When all four
beams are in place, conduct a final inspection.
FIG 9 shows a fully seated beam.
|
 |
| FIG 8 |
|
|
 |
| FIG 9 |
|
|
 |
| FIG 10 |
|
|
|
STEP 6
Connect the center support (Models:
4x8, 4x6, 3x8, 3x6, 2x8, 2x6) using
the remaining flat-head bolts and wing
nuts. See FIG 11 and 12.
|
 |
| FIG 11 |
|
|
 |
| FIG 12 |
|
|
STEP 7
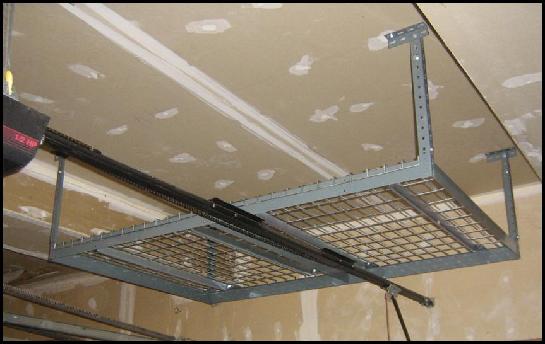
You are almost finished. Take the wire decking
and place it on the racking unit. Wire decking
remains in place by gravity and can slide
freely side-to-side. There will be a small
space between each deck. See FIG 13.
|
 |
| FIG 13 |
|
|
Take one last look at all the rivets to ensure they are properly
seated. In addition, make sure all bolts and nuts are tightly
secured. Look at the ceiling bracket lag screws and ensure they
have not backed out during the beam seating process. You are
now ready to load your storage rack.
WARNING: Load heavy objects nearest the vertical posts
and light objects nearest the center. Read the safety label
on the rack and do no overload the system. Do not climb on or
hang from the storage rack. Routinely inspect the rack over
time to ensure rivets and wire decks are seated properly.
WARNING, DO NOT EXCEED THESE WEIGHT
LIMITS
4 x 8 Frame 600 lbs.
3 x 6 Frame 400 lbs.
3 x 8 Frame 550 lbs.
2 x 6 Frame 400 lbs.
2 x 8 Frame 450 lbs.
4 x 4 Frame 300 lbs.
4 x 6 Frame 500 lbs.
These weight limits are based on a framed garage with a minimum
of 2 x 6" (standard lumber) ceiling joists at 24" or less on-center.
For truss framed garage ceiling structures, 2 x 4" (bottom truss
cord) is okay. The racks themselves are structurally rated to
double the above limits. However, the weakest point in the entire
system is the garage ceiling joists and rafter system. If, for
any reason, you suspect the integrity of your ceiling structure
is in question, discontinue the installation process. These
instructions and respective weight limits do not preclude sound
judgment and decision making when installing and loading your
overhead rack. Bottom line...Be careful, use the rack wisely
and enjoy your new found space!